Sunday 31 March 2013

Indigo Blu Challenge #2 Words & Phrases

Morning all ..& Happy Easter... and hope everyone remembered to put their clocks forward...a few less ZZZZZZZZZZZs but can always have a catnap later.

On the 21st March new Indigoblu Challenge was announced...Words & Phrases loved this theme but needed to think about it, anyway had a play yesterday and this is what I ended up with.


Live Laugh Love
Wallhanging


It was all made using Indigoblu's Live Laugh, Love stamps. Flowers, birds and dragonflies were all coloured in with Cosmic Shimmer Acrylic drawing inks which give a lovely iridescence. Having cut them out and shaping with an embossing tool I layered them up to give some dimension. I finished each flower off by adding a blob of Cosmic shimmer glue to the centre (it dries clear)  and sprinkling some seed beads I had in my crafty stash. The words were stamped & embossed in silver and then cut out with a circle die and the frame was made with a scalloped circle & plain circle die.


I


These finished framed pieces were then mounted onto this .... which cost me £1.99 ...it was an impulse buy which I saw hanging on a shelfedge in my local craft shop, I didn't know what I was going to do with it but when I was mulling over what to make for this challenge I saw it hanging from the doorknob and had a Eureka moment. I just gave it a coat of gesso & acrylic paint to finish it off.

.Here are some closeup shots of  each of the pieces:
LIVE Every Moment
LAUGH everyday


LOVE beyond words

This last pic shows the dimension I got by using embossing tool and layering up. Indigoblu stamps are so easy to use ... the impression you get is great even the first time you use the stamp. Well I'm off now to link this up with Indigoblu challenge.
When I was making this I had someone in mind who just happened to mention this was one of her favourite quotes so hope she likes it!!
That's all for now ...bye xxx Annie


Friday 22 March 2013

Fussy & fancy Friday Challenge #85


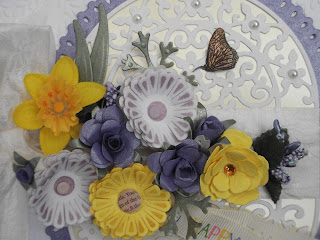
Well here it is at last my first card as part of the Fussy & Fancy DT I was relieved when I found out the subject was Spring Days, after some thought I was in the garden and realised that all the new Spring flowers, Daffs, crocuses and primroses were all shades of yellow and purple so that was my inspiration. I always make an Easter card for my mum in law who is 92 and as her eyesight is poor I like to make 'touchy feely' cards for her, plenty of textures and strong colours ...so this is my card for You and Her....


I began with the centrpiece, forming an oval on white card with Heartfelt Creations Scalloped Posy die, as this is semicircular I cut it twice leaving a gap in the middle where the ribbon band was to go, I backed it with lemon pearlised card. Then I mounted this on a purple mat cut with another die in the same set, this in turn was put onto a white mat which I had embossed with  spellbinders Garden Lattice M-bossibilities folder, a piece of white silky crush ribbon was wrapped around the centre.
The flowers were made using various spellbinders dies apart from the daffodil which is a Marie Curie charity flower I recycled.
I  tried various ways of putting the sentiment on and then found this Easter  ribbon in my stash, the finishing touch was the little 3D butterfly made from Fantasy film. I am adding a couple of closeups of the flowers & butterflies....


Hope you like it and I look forward to seeing your creations for this challenge ...
Bye for now ...Annie xxx


,


Thursday 21 March 2013

Quick Golden Wedding Anniversary card

I was asked to make a golden wedding anniversary at very short notice:


Luckily I had this set of lovely Marianne dies which I had used before to make a ruby anniversary card. This card is 6"x6" and it really is just the dies cut in gold and white card, a piece of ribbon and a peeloff. It can be used for many occasions so a good standby card. Now I need to decide what to do next .... xx Annie

Tuesday 19 March 2013

Messy!!!

In my last post I told you I to clear my messy desk and I was not kidding...


When my husband suggests I have a clean up I explain you can't create without making a bit of a mess :) xxAnnie

Daffy day

Today has been a sunny day and out in the garden the daffys are looking beautiful a reminder that Spring must be just around the corner.

Up in the craft attic I have been making easter cards for the family, I only send the to my nearest and dearest so there are not many to make. I rooted out an old favourite Elusive Images set of daffy stamps.... love the main image of a daffodil with script (I wandered lonely as a cloud.... one of my fave poems)

 The background was made with the smaller stamp of a bunch of daffs, lots of masking to make the strip ...stamped with Momento .. London Fog and coloured with promarkers, mounted onto sagey green pearlised card


This is a closeup of the main image ...photos have turned out a bit pale .. actually the card is quite vibrant. Yellow isn't a colour I use much but at Easter it has to be done.


Well that's my effort for today... more Easter / Spring cards to follow but that's all for today xxx
Annie


P.S. just a quick afterthought... after blogging I found some bits and pieces of leftovers and managed to make another quick card.
Now all that's left to do is tidy up before the boys (DH & Jasper) come back from their afternoon walk needing to be fed again

 xxx Back soon Annie 

Monday 18 March 2013

Book Card


Wow where did the past 10 days go to ...well I have been busy making a few family Easter cards and another project which will be revealed soon.
As it's too  soon to put my Easter cards up here I have had to search through some of my old cards... one of my favourite 3D cards to make are Faux Book cards quite a lot of basic preparation but once decorated they do look lovely. Sadly the only pics I could find were of an unfinished card I was making for a friend's 60th birthday ( I use these cards for milestone birthdays).


The card can be made any size you like,  the outer cover is made from a piece of card big enough to make a front and back cover plus a spine. The parts that form that make the actual faux pages are lengths of cards folded  concertina style. Four of these pieces are slotted together to make a rectangle with a recess in the centre. I decorated the back of the recess before adding the faux pages around it.
 
You can dress it up as much or as little as you like. For this book I wanted to add a special sentiment and I found a Tim holtz embossing folder which was  just made for making a flyleaf page inside a book it is from Tim Holtz Alterations texture fades range called Book Cover sets:


I stamped and embossed the sentiment onto some lovely heavy pearlised vellum, then embossed it with the embossing folder, when I was cutting it out I left enough paper to tuck behind my faux pages so that when the 'book' was opened the flyleaf still covered what was inside. All that was left to do was the fun bit ... all the decorating I was making this one 'shabby chic' with lots of labels and carte postale type stamps and of course butterflies. The inside of the finished card read Happy 60th Birthday. 


Well that's it for today ...Jasper (our black Lab) has decided it's lunch time so bye for now xx Annie

Friday 8 March 2013

Even more Excitement

Last night out of the blue I had an email from Sazzle inviting me to join her design team on Fussy & Fancy Friday Challenge blog. Well to say I was excited would be an understatement, couldn't wait to tell somebody, on telling DH I was soon brought down to earth "More crafting" was his response,he loves it really after all it saves him trawling round card shops looking for the right card ... like the anniversary he once gave  me with sentiment 'We're like two peas in a pod' hahaha.
Luckily kate (my youngest granddaughter) happened to be staying overnight and she responded immediately with a huge grin and said  "Nana you deserve it, we all love the cards you make for us" so then we  ran upstairs to the craft room for some girly time :)

Anyway back to Fussy & Fancy, their blog is well worth a look ... just click on their blinkie down on the right hand side of my blog and that will take you there , they do set some really lovely challenges. Everyone is so friendly and it is always lovely to have some feedback especially if like me most of your crafting is done on your own...so why not go and have a go... you might surprise yourself, like I did, I can't believe I am going to be working with people who's work I have admired so much. Well I have a whole afternoon to myself so I will celebrate by doing the obvious thing .. a little bit of crafting ... will post the end result later ..so bye for now Annie xx

Monday 4 March 2013

Clarity Challenge 1

I was excited when I first heard Clarity were launching their Clarity Challenge Blog,  the DT samples are gorgeous and very inspirational....then I had to make a choice!! I have dithered and dallied on this one ...problem being I admit to being a clarity stamp addict and as a result I have too many to choose from. I finally settled on one of my older stamps, I must admit I still rate this stamp as one of my favourites.

 
  I love teal & black together ...a bit oriental


a closeup of my hummingbirds and the trumpet flower background.
 
I love working on dark card for this I used Clarity coated black card stock, I stamped the trumpet flowers with  perfect medium and used Stampendous Kaleidoscope embossing powder ... it's white in the jar but when you heat it on black card, the magic happens, as you heat it more the colours change ...you can see on the plate behind the topper the range of colours it goes through.
 
I stamped my humming birds on another piece of black coated card just for placement then I used a spellbinders die to cut it, I also cut 2 more mats using slightly larger dies, as I mentioned I used a piece of canvas textured card smeared with perfect medium and sprinkled with more kaleidoscope powder to make the glittery mat.
 
The moons behind the birds were die cut from a piece of card I had gilded with flitter glue and flakes, then I made my hummingbirds using fantasy fibres and cut them out and 3d them onto my moons. In keeping with the oriental feel I embossed a piece of teal card with asian embossing folder to put behind the black background.
 
So there it is ... there are and will certainly be so many wonderful entries for this challenge but I just wanted to take part in this first Clarity Challenge.... hope you like it .
Bye for today xx Annie


Friday 1 March 2013

I'm a bit excited ....


Imagine how excited I was when I saw the email from Sazzle and then when I saw it written in black & white that I had been randomly selected to be Featured Guest Designer on the Fancy & Fussy Friday Blog challenge. After all it was the first time I had entered a crafty challenge , it was just a whim  and I never win anything or get chosen for anything.

Then the panic set in what was I going to do ...  subject was Pink & Black... then I remembered the new Just Rite lacey stamps I had recently bought, so I set to and this is what I came up with.
I stamped the lace background stamp and medallion stamp onto blush coloured card with black versafine ink, then embossed it with clear embossing powder. I handcut the background out and used a die to cut out the medallion, they were then matted & layered onto 2 shades of pink, a silver & black mat

I started making various flowers but none of them were quite right and then I remembered the coredinations ebony & ivory pad I had in my stash. I diecut the bigger spellbinders bitty blossoms  and sanded them back to show the pink core. A couple of swirls, hatpins and a satin bow and I was done


a couple of extra photos of the flowers.
 
I must thank  Sheryl Cauble from Fussy & Fancy Friday Challenge for explaining what I  needed to do
 
Hope you give this challenge a go and hope you all enjoy it as much as I did, I look forward to seeing your entries... so Good Luck ... xxx Annie